Chapter 4: Project Development
- Rakshan Bathri
- Feb 17, 2025
- 21 min read
Updated: Feb 17, 2025
Chapter 4.1: Our Chemical Device
another chemical device?
WELCOME TO MY LAST EVER BLOG THAT I'M PROBABLY GOING TO WRITE FOR MY WHOLE LIFE!!!!!!! (unless Y3 has blogs I actually don't know)
So basically, in one of the earlier weeks of this semester, my team and I had to choose a project that involved applying the knowledge we gained last semester in ICPD and this semester in CPDD. The task was to design and build a chemical device with limited functionality ⚙️.
We had to apply skills like 3D Modelling and Printing 🖨️, Arduino Programming 🖥️, and incorporate at least one mechanism from Week 2, which meant using gears ⚙️, levers 🔧, or springs. (But if you know our group, of course, we had to do extra hehe 😏)

There were 4 options to choose from❗
Option A: Disinfecting Device
Option B: Tea Brewer
Option C: Half-Boiled Egg Maker
Option D: CO Monitoring System
Q: "So which option did you choose❓
A: We went with Option D: CO Monitoring System ❗🔥 But for simplicity's sake, let's just call it a Gas Detector 🛑. Why❓ Let me tell you the context of this option.
Because of the environmental 🌍 and health 🏥 consequences of biomass combustion, such as the production of hazardous gases like CO and volatile organic compounds, a monitoring and ventilation system is necessary. However, since this project is on a smaller scale 📏 and CO is hazardous ☠️ to work with, we will replace CO with alcohol vapours 🍷 for demonstration purposes.
When alcohol vapours are identified in the air, an exhaust fan 💨 will activate to ventilate the area, effectively eliminating the gas. As a result, this system is more than just a Monitoring System; it actively responds to the presence of hazardous gases, making it a Gas Detection and Ventilation System rather than just a CO Monitoring System 🚨.
Initially, I thought this was a waste of time ⏳ because I didn’t even know that people still used biomass to cook 🍳. Then, I found some data 📊 (I only found it because I was making the slides for the final presentation 📽️), and I was shocked 😲❗

(yes I made the pie chart myself)
BUT NOT ONLY THAT

Almost 38% of the world's population was exposed to indoor air pollution 😨 (WHATTTT ❗), and to make things worse, so many people die from it in such cruel and preventable ways 💀❗

So, we went through a whole design thinking process to come up with the final gas detector and how it works (this was so tedious 😩).
We had to make a need statement and define the requirements for our product, then do a function analysis to determine the key features it needed.
After that, we had to state the product specifications (like what the fan speed should be, etc.) 📋.
Then came the WHOLE MORPHOLOGICAL CHART 📊, CONCEPT SKETCHES ✏️ for all the different variations of gas detectors we could design, AND ANOTHER CONCEPT EVALUATION MATRIX 🤯.
There was so much work😭, but in the end, we finally came up with our ideal gas detector ❗🎉
Here is our final concept sketch❗

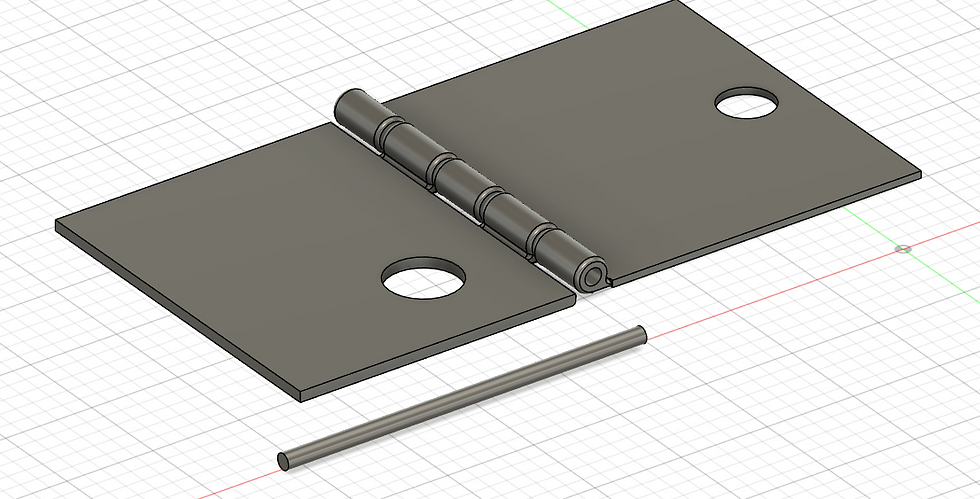
Meet Trap❗ (I'll explain why its name is Trap later)
Here is a 3D model of Trap❗ (Creds to Yoong Sern for the model)
How Trap works:
A harmful gas is detected and compared to a Set Point (SP)
If the concentration of the gas, the Process Variable (PV) is greater than the SP, (PV>SP), The MQ2 Smoke Sensor (Transmitter) sends a signal to the Arduino Board (Controller).
The Controller turns on the Exhaust Fan (kind of like a control valve) until the PV returns below the SP.
There will also be a sound and light indication of when PV>SP so we know that the concentration of harmful gases is unsafe.
Chapter 4.2: Team Roles, Planning & Execution
meet the team!


So basically, our team name is a Ghostbusters reference, and I haven't even watched it 😅. To summarise for those like me, a Ghost Trap is what they used to trap ghosts 👻 (obviously). Since we are the Gas Busters, our gas detector is called a Gas Trap, or just Trap. (Makes sense, right? 😏)
Anyways, the picture on top was our roles, so now I'll tell you all the responsibilities each of us has.
📌 Rakshan (Me) – Chief Executive Officer (CEO) 🏆I oversee everything and contribute whenever and wherever I can. I help set the general timeline for building our product and allocate the work to be done. Since I’m not great at arts and crafts 🎨, I mostly helped cut and fold cardboard ✂️📦, worked on some of the 3D modelling in Fusion 🖥️, and made the final presentation slides 📽️. (I told them I wanted to be a janitor but no one listened 😭)
📌 Fiona – Chief Financial Officer (CFO) 💰She manages the finances according to the Bill of Materials (BOM) 📜 and ensures we stay within budget. During the building process, she made sure Trap looks good ✨ and that the dimensions were correct 📏. She’s also in charge of buying materials 🛍️ and keeping us focused when we get distracted (oopsies 😬).
📌 Muhsin – Chief Security Officer (CSO) 🔒He makes sure we work safely according to the Risk Assessment ✅. During the building process, he was in charge of coding 💻 and setting up the Arduino and Breadboard connections ⚡.
📌 Yoong Sern – Chief Operating Officer (COO) ⚙️If I handle the general timeline, he handles the specific one 📅. He helps out wherever needed, making sure we stay on track. For the building process, he was responsible for assembling the parts of Trap 🔩, doing the main 3D modelling 🖥️, and helping me with the cardboard cutting and folding ✂️📦. (Basically like another CEO 😎)
Moving on, here is our BOM❗
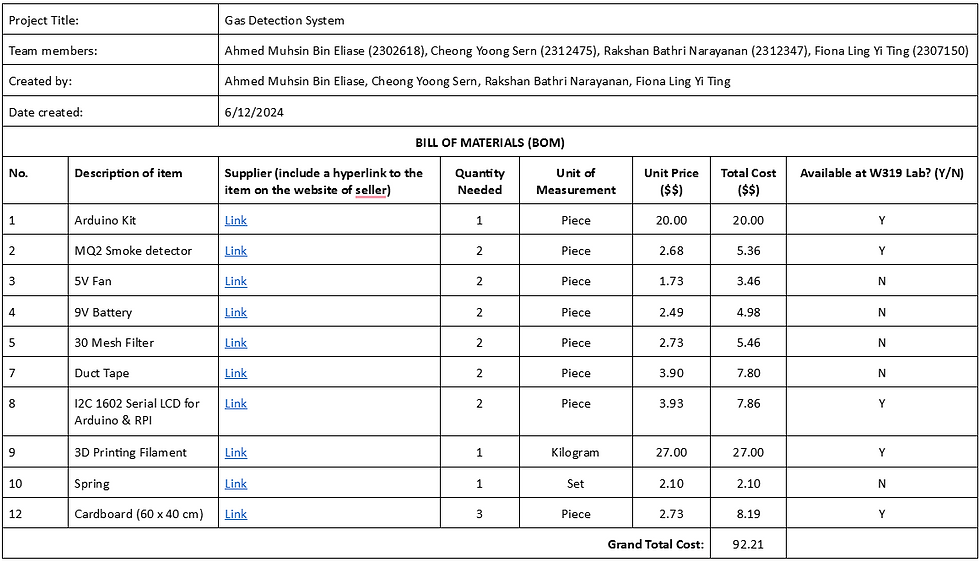
Looking back at it now, we honestly did not need two of most things 😅, but it is fine. This can be a learning experience for the future to not be so kiasu 😂. (The only reason we bought extras was because we thought some components might break #TrueSingaporean)
Next, our Gantt Chart❗
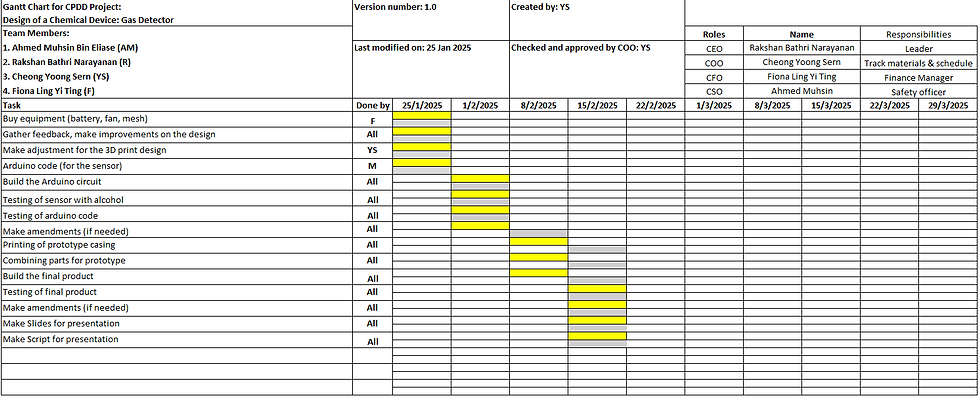
Legend:
Yellow: The tasks that need to be done
Grey: When the tasks were actually done
Q: "What on earth is a Gantt Chart❓
A:A Gantt chart is a project management tool used to visually represent a project's timeline, tasks, and team member responsibilities 📊. It helps to track progress ✅, allocate tasks 📋, and ensure deadlines are met ⏳ by displaying activities as bars along a timeline.
From our Gantt Chart, we can see that we were on track 🎯, so good job to the best COO I know, Yoong Sern 🎉👏❗
Chapter 4.3: Design & Build Process
bob the builder, can we fix it? bob the builder, yes we can!
This Part Was Not Easy at All 😩
I am now going to document the entire journey from start to finish on how we built Trap ❗🚀
Cardboard Cutting and Folding 📦✂️
We started off with the cardboard cutting and folding (This was the part Yoong Sern and I did 💪).
First, we used a pencil ✏️ to draw on the cardboard, marking where we needed to cut and fold. Unfortunately, I do not have a picture of this… 😢 BUT I do have a picture of us actually cutting and folding 🖼️❗
We got the dimensions 📏 from our product specification table, since we now knew the area the fan takes up, how tall the product is, etc.. Using this info, we were able to basically plot a blueprint on the cardboard 📐✨.
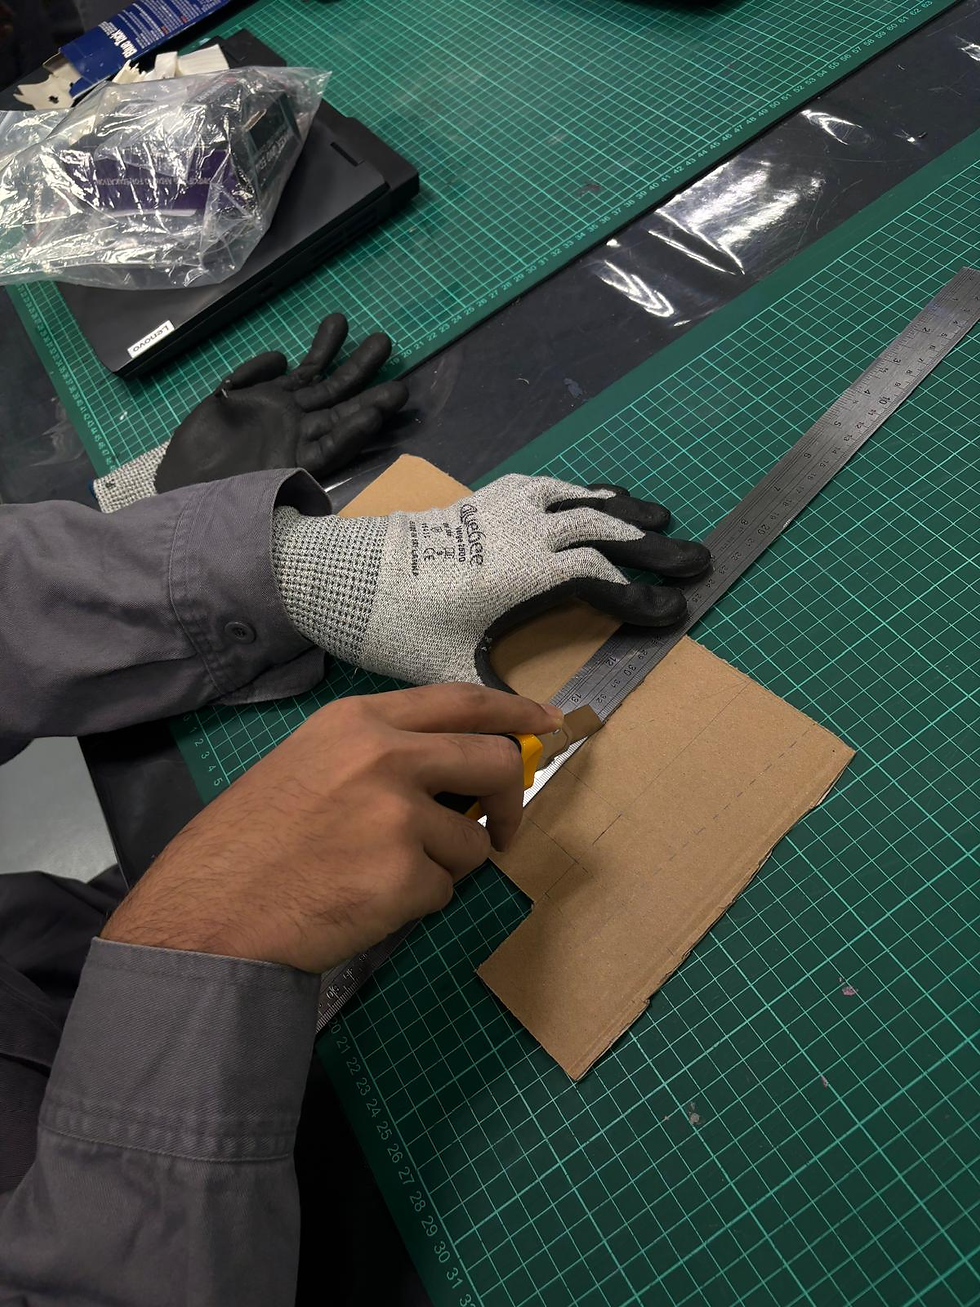

When cutting and folding the cardboard 📦✂️, we remembered to wear safety goggles 🥽 and work gloves 🧤 since we were using a pen knife 🔪.
The work gloves were needed to prevent accidental cuts on our hands 🩸, while the safety goggles were a precaution in case the pen knife blade chipped and flew into our eyes (OUCH 😵❗).
3D Modelling & Printing 🖥️🖨️
Next up was the Fusion 360 part. (Yoong Sern and I worked on this together again 💪)
After all the practice we had last semester in ICPD, this was not too difficult, but there were still a few challenges 🤔.
Since we did not use a laser cutter, we had to take some additional measurements after cutting the cardboard 📏. Why❓Because not everything was perfectly sized.
For example, when folding the cardboard, we lost a few millimetres of height. This might not seem like much, but it definitely affects our model—if we did not account for it, Trap might end up slanted ❗😱
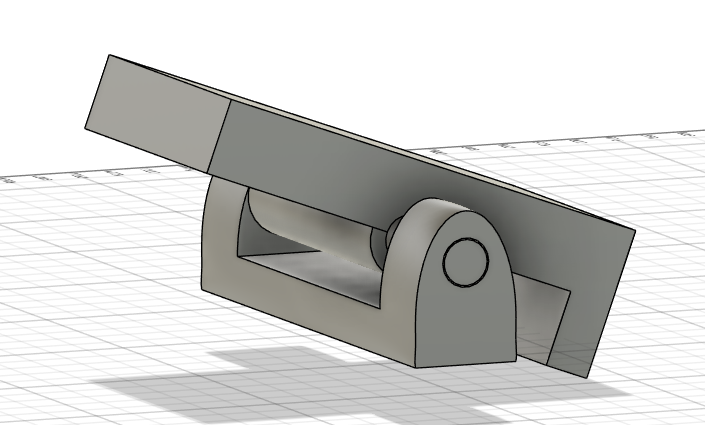
On top of that, we did not want any loose fits, so we used a vernier caliper 📏 to measure the exact diameter of the sensor. This way, only the necessary part pokes out for a perfect fit! (Look below for a reference 👀)

Q: "What is all this for❓
A: These are the sketches ✏️📐 for all the components. The two sketches on the left and centre show the base for the Arduino, along with a hinge 🔩 and a "door" 🚪 where the MQ2 Smoke Sensor sits.
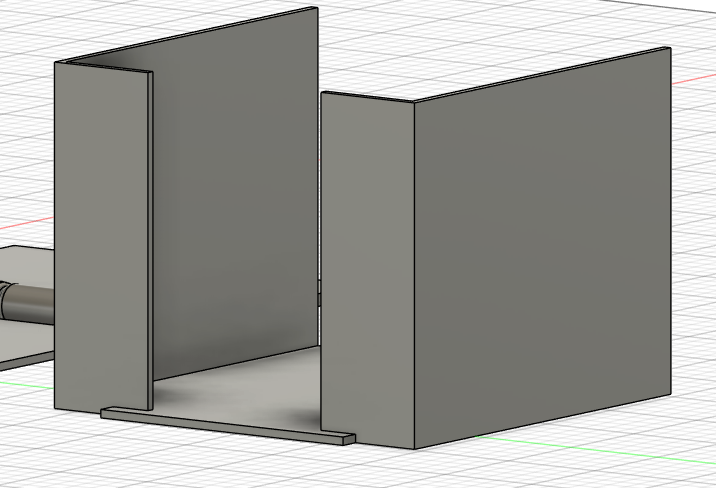
This is where the fan and filter sit, in the bottom half of Trap❗💨 We originally wanted to 3D print everything, but we realised that would be too wasteful 🏭💸. Since this is just a prototype, we decided to use cardboard instead 📦✂️ which is a more efficient and sustainable choice! 🌱✅

The same goes for the top half of Trap ❗📦 That container-looking thing is where the LCD panel sits, with holes for the wires. The three holes (which are now going to be just one 😅) are where the LED will be placed 💡✨.
Now, the part that we actually 3D printed❗

That base on the floor is where the Arduino and Breadboard will be placed ⚡🔌. The hole on the wall/door is where the MQ2 sensor will poke out 🌫️.
Since this is just a prototype, we can use a relatively lower infill for 3D printing 🖨️. Because of this, we can simply use pins to secure the MQ2 sensor in place 📌✅.
If you recall from my ICPD blog, the hinge I used for my toothbrush cap was super complex and difficult to design 😵💫🛠️.
So this time, we kept it simple and went with a standard rod-like hinge instead ✅ which was much easier and more practical❗😌

Here is a preview of our design phase before the whole systematic idea-refining process 🎨🛠️.
(I just wanted to show off my designing skills 😎, but honestly, this is waaayyy worse compared to the sketch Fiona did in the first section of this blog 😅✏️)

Next, we worked on making the lever latch system, which is our mechanism! ⚙️🔧 This latch system is glued to the top of Trap to keep everything secure and functional ✅🛠️.
When you press down on the lever, the other side rises and releases the door 🔄🚪. (I'll show a video of this below 🎥).
In case you were wondering why there's no sketch, well, there was one 😆, but the dimensions weren’t necessary since the latch could be any size, as long as it effectively holds the door in place ✅🔐.
Notice anything different? 👀 WE HAVE A SPRING AS WELL! 🌀✨
This is the second mechanism we are implementing 🔧⚙️. The spring ensures that if Trap falls down, none of the internal components will come spilling out like blood 🩸 Instead, everything stays securely in place ✅🔒.
Decorating the Cardboard! 🎨✨
Time for the fun part 😆❗ This was Fiona's task, and she did an amazing job 💅.
Basically, we cut coloured paper to match the dimensions of Trap’s exterior ✂️📏 and pasted it on 🏗️. We also used some tape to secure the sides of all the folds for extra durability 🔖✅.


We also remembered to wear PPE 🦺😷 while doing this, just like we did for the cutting and folding of cardboard ✂️📏. Safety first! ✅🛡️
Coding the Software! 💻
Next up was the coding part, which was Muhsin’s domain 🎯. This part was extremely difficult, so props to him 👏🔥❗
Basically, the code activates the exhaust fan 🌀 when the concentration of inlet gases is too high 📈⚠️. It also sounds the buzzer 🔊 (a part of the Arduino board) and turns on the LEDs 💡 to provide visual and audio alerts 🚨.
Not only that, the brilliant, genius, Einstein’s reincarnation 🧠✨ Muhsin also implemented linear regression 📊📉 to convert the raw readings from the MQ2 smoke sensor into an appropriate concentration (ppm) value, which is then displayed on the LCD screen 📟. Absolute big brain energy 🧠⚡❗

(preview of like 1/16 of his code)
Here's the code❗ (I would save it as a downloadable file but WIX does not support .ino files)
Also, the code is super long so use THIS as a skip button.
The Code |
|---|
#include <LiquidCrystal_I2C.h> #include <Wire.h> // Pin Definitions const int gasSensorPin = A0; const int ledPin = 5; const int buzzerPin = 8; const int fanPin = 7; // Pin for the fan // Sensor Constants const float RL = 10000.0; // Load resistance (Ω) float freshAirRatio = 1.52; // LPG Sensor Calibration (from sensor datasheet) // (Replace with values from your sensor's datasheet) const float m = -0.473; const float b = 1.413; // Threshold for alert (PPM) const float gasThresholdPPM = 1000.0; // Variables float gasPPM; int gasValue; float R0; // LCD Setup LiquidCrystal_I2C lcd(0x27, 16, 2); void setup() { pinMode(ledPin, OUTPUT); pinMode(buzzerPin, OUTPUT); pinMode(fanPin, OUTPUT); // Set fan pin as output Serial.begin(9600); lcd.init(); lcd.backlight(); lcd.clear(); // Calibrate R0 in clean air R0 = calculateR0(); Serial.print("Calibrated R0: "); Serial.println(R0); Serial.println("Calibration Complete. Monitoring Gas Levels."); } void loop() { const int numReadings = 10; // Number of readings to average float total = 0; float sensorResistance; float ratio; // Take multiple readings for stability for (int i = 0; i < numReadings; i++) { gasValue = analogRead(gasSensorPin); if (gasValue > 1023) gasValue = 1023; sensorResistance = ((1023.0 / gasValue) - 1) * RL; ratio = sensorResistance / R0; total += pow(10, (log10(ratio) - b) / m); delay(50); } gasPPM = total / numReadings; // Debug prints Serial.print("Raw Analog: "); Serial.println(gasValue); Serial.print("Calculated PPM: "); Serial.println(gasPPM); // Update LCD display lcd.clear(); lcd.setCursor(0, 0); lcd.print("Conc: "); lcd.print(gasPPM); lcd.print(" PPM"); if (gasPPM > gasThresholdPPM) { lcd.setCursor(0, 1); lcd.print("Status: HIGH!"); digitalWrite(fanPin, HIGH); // For high gas concentrations, run the alarm routine repeatedly for 1 second unsigned long alarmStart = millis(); while (millis() - alarmStart < 1000) { triggerAlarm(gasPPM); } } else { lcd.setCursor(0, 1); lcd.print("Status: Normal"); digitalWrite(fanPin, LOW); blinkLED(); delay(1000); } } /* * triggerAlarm() produces a beep on the buzzer and a flash on the LED. * The on-time is fixed at 50ms. The off-time is mapped from 200ms (at 1,000 PPM) * down to 50ms (at 5,000 PPM), so the beep rate increases as gas concentration rises. */ void triggerAlarm(float concentration) { const float maxConcentration = 5000.0;
int onTime = 50; // beep on-time in ms // Map concentration to offTime: at gasThresholdPPM (1000 PPM) offTime ~200ms, at maxConcentration offTime ~50ms. int offTime = map(concentration, gasThresholdPPM, maxConcentration, 200, 50); offTime = constrain(offTime, 50, 200); // Activate buzzer and LED together for the beep tone(buzzerPin, 1000); // 1kHz tone digitalWrite(ledPin, HIGH); delay(onTime); noTone(buzzerPin); digitalWrite(ledPin, LOW); delay(offTime); } /* * blinkLED() is used when gas concentration is normal. * It makes the LED blink slowly (1 second on, 1 second off). */ void blinkLED() { digitalWrite(ledPin, HIGH); delay(1000); digitalWrite(ledPin, LOW); delay(1000); } /* * calculateR0() calibrates the sensor in clean air. * It reads the sensor several times and calculates the baseline resistance R0. */ float calculateR0() { float sumRs = 0; int samples = 50; float sensorResistance; Serial.println("Calibrating R0 (Clean Air)..."); for (int i = 0; i < samples; i++) { int sensorVal = analogRead(gasSensorPin); sensorResistance = ((1023.0 / sensorVal) - 1) * RL; sumRs += sensorResistance; delay(50); Serial.print("Sample "); Serial.print(i + 1); Serial.print(": Rs = "); Serial.println(sensorResistance); } float R0_calibrated = sumRs / (samples * freshAirRatio); Serial.print("Calibrated R0: "); Serial.println(R0_calibrated); return R0_calibrated; } |

Here is what all the internal components look like❗
Even if Muhsin did get a little help from ChatGPT 🤖, I still have to give him a ton of credit 👏❗ Why❓
For example, when the concentration value was too low to read, he knew exactly what part of the code to tweak 🔍💻 to amplify the readings 📈. Absolute genius moves 🧠⚡❗
Assembling and Testing the Final Product! 🔩⚙️
It's finally time to put everything together ❗ I would show the assembly process, but honestly, there isn't much to show since it's just gluing everything together ✂️🖍️.
Nonetheless, here it is—Trap in all its glory 😍👇❗

Q: "Why are there chicken legs❓"
A:

"if you can't fight it, embrace it"
Lastly, here is a video of our Gas Detector working❗
I was extremely satisfied and grateful for my team after seeing our final product 😆👏❗ Not just because we managed our time well and didn’t let it seep into our school hours, but also because we completed most of the work during our CPDD lab sessions 💪🛠️.
That wraps up the building process... but of course, I only showed you the good parts 😏. In reality, we faced quite a few problems... 😬⚠️
Chapter 4.4: Problems & Solutions
our oopsies and how we fixed them!

Setbacks❗
Throughout the whole building process, we faced multiple challenges 😩🔧, but fortunately, they were mostly related to 3D printing 🖨️❗ We had to revise our design multiple times in Fusion for countless reasons 🤯:
The rod in the hinge was too small or too big 🔩⚙️
Spaghetti Failure 🍝💀 (A 3D printing nightmare)
Fragile Pegs 😭🔧 (They kept breaking apart)
I will focus on the 2nd and 3rd reasons because the first one can be easily addressed by tweaking the rod size accordingly. For example, if the hinge was too tight, we just decreased the rod size slightly and vice versa. Sounds easy, right❓ But in reality, we had to do a LOT of trial and error to find the perfect rod size. (This also meant waiting 1 HOUR for every single print... PAIN 😭)
But honestly, what I learnt from this mini problem was that not everything will go well on the first try, even if you have done it countless times before. Mistakes happen, and patience is key 🔑. The constant adjustments and long printing hours were frustrating, but in the end, they were necessary to get everything just right 💡✨.
Before I show you the Spaghetti Failure problem and how we solved it, let me tell you a short story...
🍝 Spaghetti Disaster: A Lesson in 3D Printing
Everything was set. The design was ready, the filament was loaded, and we eagerly hit "Print," expecting a flawless result. But instead of a perfectly formed piece, we returned to a tangled mess of filament—what's known as a spaghetti failure in 3D printing.


❌ So, What Went Wrong?
In our excitement, we skipped an essential step—calibrating the extrusion by adding a skirt. This meant the first layer didn’t adhere properly to the print bed, causing the entire print to detach mid-process. On top of that, we accidentally printed the hinge rod vertically, which lacked the necessary support structures, leading to even more instability.
🛠 How Did We Fix It?
We started with a proper bed adhesion technique, like using a skirt, brim, or raft to ensure the first layer stuck firmly.
We printed the hinge in a more stable orientation, minimising overhangs and reducing the need for excessive support.
We also double-checked our settings before pressing print to avoid unnecessary failures.
📚 Lesson Learned
The key takeaway from this experience is that patience and preparation are essential in 3D printing. Rushing into a print without proper calibration and setup leads to wasted time, materials, and frustration. Taking the time to ensure proper bed adhesion, selecting the right print orientation, and double-checking settings can prevent common failures like spaghetti printing.
This mistake, while frustrating, was a valuable learning opportunity. Had this happened during our Final Year Project (FYP)—especially when time is critical—it could have been catastrophic ❗ Understanding and addressing these issues now prepares us for more complex prints and helps us avoid costly errors in the future. 🚀
Next is the issue related to the fragile pegs.

As you know from above, we used pins to secure the MQ2 smoke sensor in place, but that wasn't always the case. Our initial idea was to use the system shown above, where we had pegs and a plate with holes in it. The plan was to place the pegs through the holes in the MQ2 smoke sensor, secure it with the plate, and let gravity do the rest. Sounds simple, right? Well... not exactly. 😅
❌ The Problem: Fragile Pegs
Well, these pegs were EXTREMELY thin and tiny. So, as you might have guessed… they kept breaking apart! 😭 Every time we tried to secure the MQ2 smoke sensor, the pegs snapped under the slightest pressure, making them completely unreliable. This was a huge issue because one of our main goals was to make our product sturdy and durable. Clearly, relying on fragile pegs was not an option. 🚫

✅ How Did We Fix It?
We ditched the fragile pegs and came up with a better solution! 💡 Instead, we poked sturdy pins through the walls to hold the MQ2 smoke sensor securely in place. To make sure our product was safe and user-friendly, we covered the sharp ends with Blu Tack 🔵 so no one would get hurt. This simple yet effective fix made our setup much more stable and reliable! 🎉

🎓 What Can We Learn from This?
Designing for durability is crucial, especially for functional components that need to withstand handling and assembly. The fragile pegs failed because they were too thin, making them prone to breaking under minimal pressure. This highlights the importance of considering material strength, thickness, and real-world usability during the design phase.
This is exactly why prototyping is essential❗ It allows us to spot design flaws early and make necessary improvements before finalising the product. By switching to a sturdier alternative—securing the MQ2 sensor with pins instead—we improved the product’s reliability while maintaining ease of assembly.
Had this issue persisted, especially during a critical phase like the Final Year Project (FYP), it could have led to delays and major setbacks❗ Identifying and fixing this early saved us from potential disaster later on. Lesson learned❗ 😤
Chapter 4.5: Project Design Files
try it for yourself! (if you dare)
As promised earlier, I'll give you guys the project design files + an embed so you can play around with it as well❗
Here's the file for the middle part of Trap with the rod (WIX only supports .dwg files)
Here's the file for the Latch (WIX only supports .dwg files)
Chapter 4.6: Overall Reflection
final stretch.
Okay, this is the last reflection I'm going to write for my blogs so this might take a while to read. (Sorry Ms Tan)
To be completely honest, I was not looking forward to working on an entire project. This fear began all the way back in ICPD and likely stemmed from knowing how challenging the process would be. Naturally, this hesitation carried over into this semester as well. Not only was I aware of the difficulty of the project itself, but I also had to juggle other modules like SIP, which had similar due dates. Balancing both workloads was tough, and it felt like I was constantly trying to stay on top of everything.
Because of this, I felt that my contributions were not as significant as those of my teammates. However, as CEO, I acted as the backbone of the group, ensuring that I could support my team whenever possible. More importantly, since my group members trusted me, they did not hesitate to ask for help when needed, which made me realise that my role, while different, was still valuable. However, despite this, I still felt that I had not contributed enough, so I decided to focus on what I was best at, which was designing and creating the final presentation slides. When I brought this up to my team, they reassured me that everyone has their own strengths and that they understood this was not my area of expertise. This led me to my first major lesson:
Lesson 1: A Leader’s Role is to Guide and Maximise Team Efficiency
Being a CEO does not mean being the best at every task, but rather understanding each team member’s strengths and ensuring that they are utilised effectively. For example, if I had forced myself to help with designing, I would have probably only improved efficiency by 25%. However, by focusing on tasks I was better at, I could increase overall efficiency by 50% or more. Learning how to delegate effectively and trust my team was a crucial takeaway from this project.
Lesson 2: Patience and Planning Ahead Are Essential
Another key lesson I learnt was the importance of patience and not being last minute. Had I been more patient, I would have avoided mistakes like skipping the extrusion process in 3D printing, which led to unnecessary failures. Beyond that, if we had been more forward-thinking in our task planning, our final product could have been much better.
For example, our laziness caused us to consider using a laser cutter too late, meaning we missed out on making a better-looking product. Instead of using acrylic walls, we had to settle for cardboard and hand tools, which, while functional, did not give us the sleek finish we initially envisioned. This experience showed me that good planning and timely decision-making are crucial in project development.
Lesson 3: Embracing Challenges as Growth Opportunities
The third and most important lesson I learnt was to overcome my fear of challenges and instead see them as opportunities for growth. My first challenge was accepting the difficulty of this module. The next challenge was having the confidence to lead a team.
When I was first appointed CEO, it felt different from other leadership roles I had in previous modules like POS2. The pressure was greater because of the significance of this project’s weightage. At first, I was extremely hesitant and worried that I might come off as too bossy. However, over time, I realised that it all comes down to communication and tone. There is a huge difference between being a leader and being a boss.
A boss commands, while a leader guides, and I feel that in this project, I was able to be a leader. I helped keep my team on track, supported them where I could, and most importantly, identified their strengths and used them to successfully create our gas detector. This experience has given me more confidence in my leadership abilities, which I will carry forward into future projects.
Recognising That Learning is Ongoing
While this project has taught me valuable lessons, I also recognise that my learning is far from complete. This was a small-scale prototype, meaning there is still a lot more to explore when it comes to designing and developing fully functional chemical devices. Many aspects, such as real-world application, long-term durability, and industrial scalability, were not covered in this project due to its limited scope.
For example, our Gas Detector was built using cardboard and hand tools instead of more industrial-grade materials and precision manufacturing techniques. In a real-world scenario, these factors would play a crucial role in ensuring the effectiveness and longevity of the device. Additionally, we relied on basic Arduino programming, but in professional settings, more advanced microcontrollers and embedded systems might be required.
This project was a great starting point, but it has made me realise that there is still so much more to learn and improve on. If I were to take on a larger-scale project in the future, I would need to deepen my knowledge in areas such as mechanical stability, advanced coding, and better material selection.
By acknowledging these gaps, I am motivated to continue learning and refining my skills, whether through future coursework, independent projects, or even industry experience. Understanding that there is always room for improvement is a crucial mindset that I will carry forward in both academic and professional settings.
Final Thoughts on This Module and Blogging
This module has opened my eyes to the wide range of job prospects available to chemical engineers. Chemical engineering is such a broad field, and this project gave me a glimpse into just a fraction of what we can do. It made me realise that our skills are applicable in many different areas, from mechanical design to electronics and programming. This experience has broadened my perspective on the field and the opportunities that come with it.
As for blogging, I will be honest, I still hate it because of how time-consuming it is. However, I will admit that it is meaningful. Documenting everything ensures that I am actually learning from the process, and the final reflection at the end of each blog forces me to analyse my experiences and extract valuable lessons. While I may not enjoy writing these reflections, I do see their value in helping me grow and improve.
Conclusion
Looking back, this project was challenging but rewarding. It taught me the importance of leadership, patience, planning, and adaptability. While I initially feared the workload, I am grateful for the experience because it has made me more confident, capable, and prepared for future challenges. Moving forward, I will apply these lessons to future projects such as my FYP or anything passed on to me during my internship and more!
anyways that is all I have to say
thank you for reading.
~The End~


Comments