Chapter 4: Actually 3D Printing!
- Rakshan Bathri
- Aug 3, 2024
- 13 min read
Updated: Oct 17, 2024
Chapter 4.1: Intro + Recapping Last Blog!
recap recap recap
Fourth and Final Chapter!
YES you heard that right❗ This is the last chapter/blog that I'll be uploading (for now)
Before I start yapping, let's quickly recap what was covered in the last blog❗ Soooo, last blog which was titled 3D Printing was kind of a lie and I really only did 3D Designing (sorry for the clickbait😞) BUT this blog we are ACTUALLY 3D Printing but that's covered in a later section so stay tuned for that❗ Okay let me actually start recapping now. In Chapter 3, we (ok technically "me" but "we" sounds better) used Fusion360🖥 to create a design to store a motor. I'd say that the purpose of that was just to familiarise ourselves with Fusion360 just for Practical 5️⃣ which I'll be covering in this blog. Practical 5 is by far the BEST✨✨ one yet! I get to use ALL 4 of my brain cells to come up with a product that has a movable joint. 🤯 Sounds easy right❓ Well technically it is but the product should also be extremely difficult to manufacture using subtractive technologies so that WE (yes we) can fully appreciate why 3D printing (Additive Manufacturing) is so good❗
Chapter 4.2: Subtractive Manufacturing!
I know what's additive but what's subtractive manufacturing??
Subtractive VS Additive Manufacturing!
In Chapter 3, I talked about Additive Manufacturing which is basically just making things from scratch🔨 Additive Manufacturing is more economically friendly and also contributes towards UNSDG 12: Responsible Consumption and Production. Why❓ Because we don't waste any resources❗❗ (quite simple right?) If you want to know more, you can refer back to Chapter 3 or just do a Google search or something. Okay now let's focus on Subtractive Manufacturing since that's the main idea of Practical 5❗
A sort of manufacturing technique🛠 known as subtractive manufacturing involves removing material from a uniform workpiece (remember the statue Michelangelo made) or block to create a specific component of the desired end product. Techniques like milling can be used to remove the material❗ Milling is the process you can see on top! It's basically like using a miller to "mill" away the things you don't need. Then, the product that is created from every workpiece is assembled together to create the intended final result. However, products that require subtractive technologies frequently waste a lot of material and contaminate/pollute the surrounding area with chips or dust. (this is not environmentally friendly at all 😭 ) Furthermore, a major drawback of subtractive manufacturing is that designing items with any internal moving parts is very challenging and almost impossible❗❗
That's where 3D Printing comes into play❗❗
Most hinges often have some sort of internal moving part. If it doesn't then there are probably some hard-to-access regions that are a part of the hinge. So of course, Subtractive Technologies like Milling can't be used which is where 3D Printing really ✨excels✨ Hence, I took this into consideration when trying to design my product❗❗
Chapter 4.3: Brainstorming!
time to put my thinking cap on!
Okay to be honest I really didn't need to brainstorm THAT much because I knew exactly what I wanted😵 Let me tell you the story. (I'm gonna start yapping) So when I was travelling, I had to put my toothbrush in one of my bags. Nothing wrong with that right❓ But I lost the only toothbrush cap I had so I had to wrap the bristles in a Zip-Loc bag and since I wanted it to be clean, I wrapped it a bit hard (maybe a bit too hard) and the bristles started FALLING OFF❗❗ IT'S NOT JUST THAT❗ I was fine with losing some bristles but the worst part was the neck of the toothbrush wasn't covered....and I saw the airport security pick up my toothbrush by the neck with their uncleansed hands🤢🤢 that probably hadn't been washed since the shift started because they thought it was a concealed weapon❓....I think you see where I'm going with this. So, my brilliant idea was the make a toothbrush cap that not only covered the bristles, but ALSO the neck💡 I figured that this would be the perfect design to 3D print as you don't really see toothbrush caps that cover the neck as well. In addition to this, I can also add a hinge to the lid and base so that it looks cool AND can't be manufactured using Subtractive Technologies❗ (win-win fr)
Chapter 4.4: Designing!
time to solve my problems
Designing Stage (this took too long)
Okay unlike Chapter 3 I'm not going to make another tutorial again BUT i'll still go through the key steps needed to make my Toothbrush Cap🦷. Normally I would make a sketch of what I want before I actually start designing it but I really wanted to test my imagination and creativity🤩🤩 (I regret this)
Okay first thing you need to do is take some mugshots of your toothbrush (preferably with its dimensions). You'll need the height, length and width.


mugshots
Next thing you need to do is make a rectangle sketch with the the dimensions being slightly more than what your toothbrush needs. (maybe around 2mm) Then make an offset of 2mm for the walls❗

Then, extrude the walls to HALF the height of the toothbrush (again maybe add another 2mm). After that cut a small opening at the shorter side something like what you see below. (The opening is based off the difference of the width of your tootbrush head and the neck)

Next step is quite simple. Just mirror it 0.5mm away (yeah thats all)

Okay this part is a bit complicated. You need to make 2 construction planes on the top surface of the right box and the left surface of the right box. Then, make an axis around these two planes😵😵

Ok thats the first tricky part but after that you should be able to play around with the 2 pieces around the axis❗❗

yipee
The box looks boring right❓ Let's fix that❗ Extrude the bottom of each surface by 1mm with a taper angle of -45 degrees. (this is just for aesthetic purposes)

Now, lets create an offset on the top surface by 1mm on each box. Then, on one side, extrude it out 2mm with -45 degree taper angle and do the same for the other but cut it instead. This is to ensure that when you close the box off, it doesn't wiggle around. (if you want you can also fillet some of the corners to make it look more smooth) It should look like this.

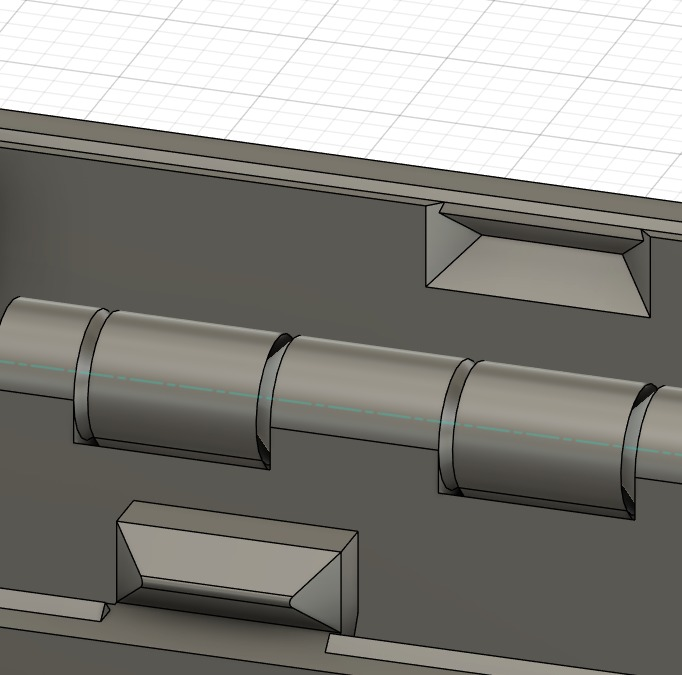
HINGE TIME❗ HINGE TIME❗ (this part sucks)
Make a sideways cylinder with a height of 3mm and the diameter with what you see here. (it's hard to explain how to choose the diamter ok) Then move it to wherever you like but make sure that it is a NEW body and DON'T CLICK JOIN.

Now, hide the 2 main bodies and mirror the cylinder 0.5 mm away like this.

Then cut the back surface of the cylinder closer to you with a taper angle of -45 degrees and 2mm deep. On the other cylinder, do the same thing but extrude the front surface instead. It should look like this❗ (I think you can start visualising how the hinge works by now)

This part is a bit tedious... On the back surface of the back cylinder, make this sketch. All the angles are 90 or 45 degrees to each other. (it looks complicated but it's really not, trust me)

After that, extrude the sketch like what you see below❗❗

Then mirror these 2 bodies once, then mirror the mirrored bodies once again❗ (does that make sense) After that, move the bodies to wherever you like. I chose the centre. (I forgot to take a screenshot of moving it)

ALMSOT THERE❗❗❗ Next thing you need to do is cut out the pointy bits coming out of the circle. After that, cut out another 0.5mm on each side for the tolerance.


Last thing you need to do is.... COMBINE THE HINGE AND BODY TOGETHER❗❗❗❗

This is our final product. 😎HOORAY😎
But, if you remember from Chapter 3, this is just the designing portion, we still need to slice it. So now, let's go to CURA and choose our Slicer Settings❗
Chapter 4.5: CURA!
we can almost start printing!

CURA Settings❗
This part is honestly quite straight forward. It's just inserting your design and slicing it with the settings that make sense. Sooooo, here's my settings and why I chose them (this part is a bit boring...)
Resolution: 0.15mm was used as the smallest difference between any parts in my design was only 0.2mm.
Infill Density: 15% infill density was selected since, being a small product, it is simply intended to cover the toothbrush head and does not require a high infill density. Additionally, it saves filament, makes the Toothbrush Cap lighter, and enables faster printing times. Since I didn't want my print to have potholes❌❌ or to be overly brittle and shatter when subjected to little forces like being dropped from a small height or squished between objects in a bag, I didn't want to go below 15%.
Infill Pattern: Grid Pattern was utilised since it is the most common infill design and offers a durable and even dispersion of material (W english skills) The outer layers are also consistently supported by the grids' uniformity.
Support: No Supports are needed as all overhangs obey the 45 degree rule (This is why I chose the taper angles to be 45 degrees. # thinkingahead)
Build Plate Adhesion: To ensure a smooth filament flow, the extruder was primed by utilising a skirt. With the design's large baseplate surface area and ability to balance on its own, my print didn't require any additional Plate Adhesion.
Okay that pretty much covers the CURA section. So now we can finally start 3D PRINTING❗❗
Chapter 4.6.1: Trial 1
because not everything goes smoothly...

LOOK❗❗
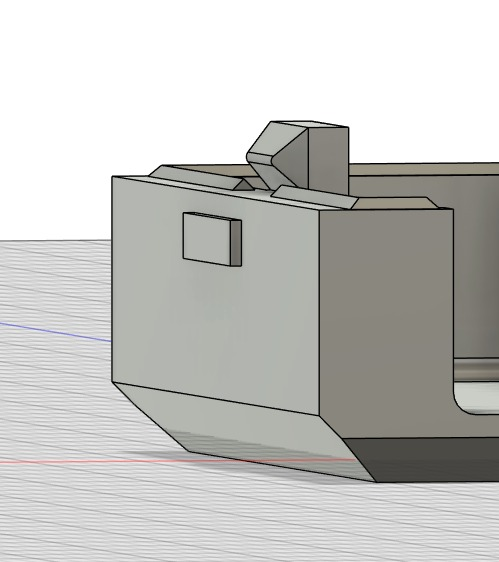
When I first printed it I was so so so so proud of myself✨😎🤩🤯🔥. Like I couldn't belive that I desgined AND printed this. (so original fr) But... there were some problems. My toothbrush couldn't fit😭😭 and also I realised that there was no locking mechanism. So the next thing I had to do was add a Snapfit lid thingy to my design and of course, reprint it again but bigger.
It's not just that though. Remember when I extruded the bottom and top surface of the product? yeah it wasn't really visible so I had to change that too.
Here's a re-enactment of what I first felt when I tried to use it😡
Okay but let's not waste anymore time and now I'll show you how I added a snapfit lid thingy and also how I made my print wider and more detailed❗
Time to design again....
First thing I did was split both of the boxes in half then I just used the extrude function again to connect it back together.

Next thing I did was change how much I extruded the bottom and top surface. From 1 mm to 2mm.

Then, I made a rectangle at the centre of the inner surface and cut it into the walls with a taper angle of -45 degrees. This is where the Snapfit thingy locks on to. I also chamfered the top edge so that the snapfit thingy can "snap" into the hole I made. (you can fillet the inside of the hole if you want to make it smooth)

Then on the other box, I made a cuboid with the same Length, Width and Height.

After that, I used the Draft function to make a 60 degree slope and cut the back part of the rectangle by 0.2mm. Then, I extruded the same surface by 1mm and -45 degrees taper angle. This was to ensure that the snappy thingy can snap into the hole. I also filleted the edge.

I then removed the extra ledge since it wasn't needed anymore. I did the same thing for the other side as well (why does this sound so mean)

And.... THAT'S ALL❗ (at least for now...) The final product should look like this❗❗
Now all we need to do is print this and hope for the best🙏🙏
Chapter 4.6.2: Trial 2
what now.

As you can see on the left, that was the final product. Was❓ Yes, Was. I was planning on submitting this but I really wanted to add something else to it. When I tried opening and closing the lid, I found out that it was actually quite difficult. Not because of the Snapfit's "snapiness" but more of because I didn't include any thing to hold onto when trying to open it. Look at the video below for an example of what I mean.

Yeah my fingers were slipping off and it took a decent amount of strength💪 to get it open because of that. (I was also testing my 15% infill at the end) But the real question is, how do I fix it❓ So I searched the internet for some references on how an actual Toothbrush Cap looks like and I realised that they have extra tabs on the side for some friction/holding point. Therefore, the next thing we need to do is add some tabs to the lid❗
Time to design yet another time...(hopefully the last)
First thing I did was make a rectangle and extrude it.
I did the same for the other side as well. After that, I used the draft function again to make a slope (this is for aesthetics) Then I moved the two tabs to whereever I liked it.

Yeah that's all YAY❗❗
Next thing we need to do is print it (hopefully this will be the last time)
Chapter 4.6.3: Final Product!
omg finally

IT'S DONE❗❗
After so long I can finally close my Fusion360 and uh idk. I'm just glad😁😁 that I don't need to design or print anything else❗ (for this semester only though)
Q: "I still don't understand how the hinge works though..."
A: Don't worry❗❗ Let me explain how❗ (at least I'll try my best to) My hinge is constructed🔨 from two mirrored pieces, one cylinder that is caved in and another that has an extrusion with the same dimensions as the cave, in contrast to other hinges that rely on a rod. It can move because the portion that is protruding out will rotate within the cave.
Oh you want to see it in action❓SURE❗

DON'T FREAK OUT❗
To the teacher whos marking my Tootbrush Cap, I submitted a freshly printed one ok. The one in the picture was another one I printed for myself.
Okay let's get back to the topic. Remember when I talked about Subtractive Manufacturing❓ Let me explain more in detail now that we have a product and why Subtractive Technologies can't be used.
It might be somewhat easier to construct the caved-in cylinders at the hinge's ends if a subtractive manufacturing method known as milling was used, but it would be way more challenging to form the same cave in the middle because the end mill would need to be made in a way that enables it to bend 90 degrees. Furthermore, an extra level of precision🔍 is required because the end mill's dimensions must match those in the design. This would also result in increased costs😨😨 for the entire process because it would be expensive💲💲 to make end mills with a precision of up to 0.5 mm or an exact 45 degrees taper angle.

That's not all❗Because of the extrusions on each hinge portion, even if the two sections were still made with the necessary dimensions, it would still be impossible😵 to assemble the top and bottom parts together. Therefore, by using additive manufacturing, where the hinge can be printed in place-is the sole method available for creating the hinge❗
Thus, if my product were made using subtractive technologies, it would not only take a long time and a great deal of precision, but it would also be impossible to join the two components together without changing the design.
You might be wondering, I only talk about how my product is hard to manufacture using Subtractive Technologies, but does that mean it's easy to manufacture using Additive Technologies like 3D Printing❓ YES❗
I am able to easily and precisely design my product using Fusion360's tools before sending it off for 3D printing, and, I don't even have to worry as much about the dimensions changing in the process😁
The majority of 3D printers employ a technique called Fused Deposition Modelling, in which each component is created layer by layer for the actual printing process (I talked about this in Chapter 3 as well❗) Complex hinges, like my Print-In-Place hinge, can be manufactured on the spot and don't need to be assembled later because the parts are printed layer by layer. Not only can my hinge be manufactured using 3D printing, but any other device with internal components can too.
Hence, while 3D printing makes fabrication of my toothbrush cap simple, subtractive technologies makes manufacturing difficult.
Here's a timelapse of the print. I'm so glad😁 I printed another Toothbrush Cap because the product from this printer was 🤢 But, at least it made recording a timelapse easy❗❗
Heres the Fusion Design File❗
Also, here's the timelapse of me designing my product❗
Chapter 4.7: Reflection + Conclusion
is this really the end?

You want to know something funny❓ I was always introduced to the Conceive-Implement-Design-Operate (CDIO) framework in every module and thought to myself "when do we even need to use this" and etc. But after coming up with my own product I realised that I actually DID use the CDIO Framework. (🤯 <- me right now)
I Conceived ideas (because of airport security)
I Designed my product using fusion
I Implemented my design by of course, printing it
I Operated my design by using it!
I KNOW THIS SOUNDS CLICHE OK❗ But when I first realised, I was amused, bamboozled and flabbergasted😲😲 (W english again) Okay you get point. I just find it interesting how almost everyting we learn can actually be implemented EVERYWHERE❗ Even 3D printing❗ (I say almost everything because I still don't know the purpose of the DCHE SDL Framework...maybe it's just me)
And now, for the final part of this Chapter. No excessive bolded words, no emojis.
I honestly still do dread blogging because of how long it takes. But, it really helped me realise how I still have many things to learn and, it thought me the importance of reflecting back. I used to think that reflections were boring and just a waste of time. Maybe it is if the way you're doing it is on a google doc with a 600 word cap and due one week after a practical. Im talking about POS1 Reflection Journals btw. But when I really spend my time thinking about my journey, I start to visualise how whatever we do has a purpose. To me, reflecting is not something I can explain. it's like reminiscing but like seeing the purpose of it. Okay thats enough of my yapping. Blogging has its ups and downs.
See you next semester, but for now,
Thank You.
(follow me on Instagram @rrak.n)


Comments